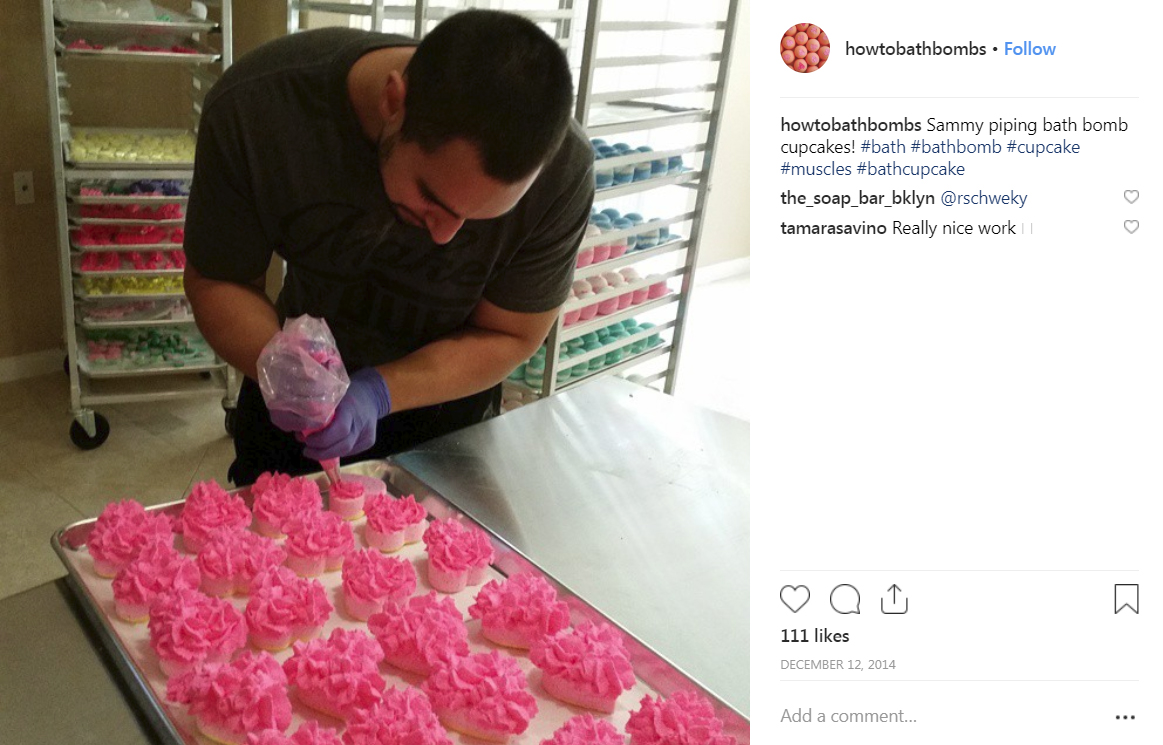
Fizzy Frosting Bath Cupcake Recipe

Make a fun bath treat topping that is activated by water

Use this recipe to make an exciting, versatile topping for your cupcakes, bath bombs, and other bath treats.

Question:  Why is this fizzy frosting/fondant different?

Answer:  It is activated by water!

Yes, it actually bubbles and fizzes when it touches water!

You can use this recipe to make two different toppings:  frosting and fondant.

To get frosting, you simply pipe it on a cupcake right after it is mixed. On this floating bath bomb cupcake, the pink was piped and the yellow lemon was made of fondant.

Floating bath bomb with fizzy frosting

Make toppers out of fondant

For fondant, let the frosting relax in an air tight container for about two hours and then roll it out like sugar cookie dough to make toppers (see below).

Make bath bomb cupcakes & toppers first

Make your toppers and bath bomb cupcakes on one day and then frost them on the second day.

Use Mini Cookie Cutters for Fondant

Cut the fondant into adorable shapes with Mini Cookie Cutters .  Cookiecutter.com  has almost 250 different shapes to choose from!  You can find something for any holiday or occasion.

Roll it out, texture, and then cut with a mini cookie cutter.

Pumpkin Bath Bomb Cupcake

Embed frosting chunks for spinning bath bombs

Later, you can embed chunks of left-over frosting in bath bombs for attractive designs.  The frosting will give your bath bombs light bubbles and slight buoyancy.  You can use it to make a floating bath bomb spin.

Starry Night Butter Bath Bomb. Fizzy frosting adds buoyancy and light bubbling.

Starry Night Bath Bomb

The following bath bombs were decorated or enhanced with this fizzy frosting recipe.

Pumpkin bath bomb cupcake. The mini pumpkins were rolled out of fondant and the white frosting was piped.

Pumpkin Bath Bomb

Santa’s floating bath bomb cupcake.  The green tree was made from fondant that was textured with a rolling pin and dusted with shimmer.

Santa Bath bomb cupcake

Embed colorful fondant hearts in this bath bomb recipe.

Bath Bomb with Fondant Embed

Fizzy Frosting is Awesome

So cool, right?   I was the owner of FizzButter Bath Bakery and I invented this fizzy frosting recipe.  I wanted a frosting that was activated by water.

It took some trial and error but this frosting recipe takes any bath treat recipe to the next level.

For Best Results:  Measure  Ingredients by Weight

This recipe is more technical than most so be as precise as you can with your measurements.  The best way to do this is by using a kitchen scale and convert this recipe to weight.

I use this exact kitchen scale  from Amazon for measuring ounces and grams.


Kitchen Scale

Get my favorite Kitchen scale from Amazon

Be a bath bomb wizard!

It’s very easy to measure by weight so do not be intimidated.  It will also help you to really get to know these ingredients and become a real bath treat wizard.

The first time you make this recipe, record the weight of each ingredient and then use weight measurements instead of cups and tablespoons on subsequent batches.

Fizzy Frosting Recipe / Bubble Fondant Recipe

Recipe authorFizzButter
Frosting Yield:  Frost around 15 large Wilton hearts.
Fondant Yield: 40 to 50 small toppers.

NOTE: INGREDIENT NAMES LINKED TO AMAZON FOR EASY PURCHASE.

Buy at Amazon
IMPORTANT:  make your fondant toppers the day before you plan to frost cupcakes.


  1. STEP 1: Before you begin.

    You will need a hand mixer, Wilton 12-inch bags and one or two Wilton 1M star tips.  Never add fragrance to this recipe or your frosting will not rise correctly.

    Wilton bags

    Wilton 12 inch cake decorating bags

    Wilton 1M Star Tip

    Wilton 1M Star Tip

  1. STEP 2: Put the following ingredients in a bowl in this order:

Mix ingredients in a medium sized mixing bowl.  If ingredients stick to the bowl, scrape off and re-mix.  Mix just enough to get everything evenly distributed and move on.


  1. STEP 3: Add two more ingredients & mix

  • Mix in baking soda and cream of tartar. Note: this is regular kitchen cream of tartar and not tartaric acid.

  1. STEP 4: Add final two ingredients

  • 3 TBSP Corn starch
  • 4 TBSP citric acid (fine grain works best…like Milliard)

Once you add the citric acid to this mix, it is activated and must be worked with immediately!

Now, use this mixture to either frost cupcakes or make bubble fondant for toppers.

Let’s make fizzy frosting:

Fill your Wilton bag halfway, twist to hold, and pipe it on your cupcake.   On a heart, I liked to do a half circle swirl on each side and then do fill the middle.  It will depend on the shape of your bath cupcake.

Just remember, the frosting will rise about 60% so don’t put too much on the cupcake.  When that happens, it will slide too far off the sides and look less attractive.

After you pipe all your cupcakes, place your favorite topper on each cupcake while it is still wet.  We used fondant Christmas Tree’s, Pumpkins, Hearts and lemons.  This company has almost 250 different kinds of Mini Cookie Cutters so you can do something for every holiday or theme.

Do you have Leftover frosting?

Just pipe it directly onto wax paper, let it dry, break it into chunks and you can use it to embed in bath bombs.  It will add color, bubbles, and buoyancy to any bath bomb.  Once it dries you can store it for over a year in a ziplock bag.


For bubble fondant toppers:

Roll your frosting into a ball and place it in a tupperware container.  You have to use a pretty big container because the frosting will rise so much it may lift off the lid.

Let the fondant rest for about two hours.  You can tell it’s done when it stops rising like crazy.  Please note:  it’s better to use the fondant too early vs. too late.  Once it dries out, it is a useless substance and you will have to throw it away.

Test your fondant

Take a walnut sized piece to test.  Roll it out to 1/4 inch and finish with a texture roller.  Does it hold the texture?

When the fondant is just right, it acts and feels just like sugar cookie dough or fondant.  It holds impressions and you can use a cookie cutter to cut out shape.

Make Toppers from Fondant

Lightly ‘flour’ your work surface with baking soda.  Take an orange sized piece of fondant mixture and roll it out to 1/4 inch with your plain rolling pin.

Next, use a textured rolling pin and add creative texture to your topper.   Have fun

Finally, cut out your shapes with mini cookie cutters.

Fizzy Fondant Hearts

Make adorable toppers out of this bubble fondant.  Use different rolling pins to get different textures.

Topper Making Tips

Try to cut the toppers as close as possible.   In addition, I like to have around six mini cutters because they start to stick after a about 10 uses.  When you are starting out, use a less intricate design with fewer corners.

After you cut out your first set of toppers, add a little bit of new fondant to the unused fondant that was left around your cuts and roll it out again.  You can usually do this a few times but if the old mix starts to get brittle, just throw it out and use only new fondant.

Troubleshooting Fondant

If your batch is too wet, it will severely stick to the mini cookie cutter and it won’t hold a rolling pin texture (it will rise out of shape).

If this happens, simply add about a 1/2 tablespoon of baking soda and work it through your apple sized ball.

Now re-roll it out, add texture, and then cut toppers.

I like to use a flat knife to move the cut-out pieces to dry on wax paper.

The extra fondant mixture will dry out quickly so be sure to re-wrap it between use.

Air dry these in a low humidity area and store in sealed ziplock bags.  These will last for over a year if they are kept dry.

Rolling Pin Tips and Tricks

First, you’ll want to use a smooth rolling pin like this 9-inch Wilton fondant rolling pin from Amazon.  Wilton makes a longer rolling pin but this size works well with the small sections of fondant we will roll out at once (so it doesn’t dry out).

wilton rolling pin
Smooth Wilton 9-inch Rolling Pin from Amazon

Next,  use the smooth pin to get a 1/4 inch thickness on your bubble fondant.  It is nice to have more than one 9-inch pin on hand if you are planning to work with multiple colors or do a large job.  Please note:  Never use this mixture with an aluminum rolling pin.

Now, we get to have some serious fun!

There are a wide assortment of textured rolling pins to jazz up your toppers.

We used the purple textured rolling pin in the image below on our Santa’s Cupcake above.

Rolling Pin AssortmentPlastic textured rolling pins from Amazon.

Never put these plastic rolling pins in the dishwasher.  They have seams along the sides that allow water to get inside of them.

Overall, small textures work best.

We really liked this Wilton Fabric roller from Amazon because it catches shimmers exceptionally well.

Note:  Buy two of these if you plan to make a lot of toppers because it will start to stick and it’s very hard to wash and get all the way dry in the middle of a project.

Wilton Fabric Textured Rolling Pin


Troubleshooting your Fizzy Frosting

Have I added too much water?

If your frosting rises over 100% and flattens out about 5 minutes after it is piped, you have added too much water.   This is when you will be happy you weighed all the ingredients because it makes it very simple to adjust.   Re-do your batch and you will usually want to take out a gram or two of water at a time.  

Also, you don’t have to throw away your work.  RECOVER EVERYTHING!  You can use this failed mix to make toppers.

Remove the frosting from the cupcakes as soon as you see it has flattened.  Next, roll the fizzy frosting into a ball, and then store it in inside a sealed tupperware container.  Once it settles and dries a little bit, you can roll it out like fondant.  This usually takes and hour and half to two hours.  

Have I used enough water?

If the mix doesn’t rise very much and is impossible to pipe through the bag, it does not have enough water.  It is not too late to fix this.  Put the mix back in the bowl, add a gram of water and mix.  Try to re-pipe.
Is storage important?
YES!!!!!   Humidity will cause this mixture to mold.  All toppers and cupcakes must be cured and stored in low-humidity (under 30%).
The good news is that your little toppers have a shelf life of over one year if they are stored in a sealed ziplock bag.
Cupcakes should be used immediately after opening.
http://www.youtube.com/watch?v=eiQmuu_coQ8


Submit your review
1
2
3
4
5
Submit
     
Cancel

Create your own review

Fizzy Frosting
Average rating:  
 3 reviews
by Delia on Fizzy Frosting

We made cupcakes and used this frosting. I like how it helps them float and the bubbles and color are cool. TY

by Jerisha on Fizzy Frosting

It's prob the coolest thing ever. Wow.

by Serena on Fizzy Frosting

Thank you so much for sharing. It worked great and I did little hearts textured with stars! Then, we dusted them with silver shimmer. They are amazing.


Want to ask any bath bomb making questions?

Post them in the comments below and I will answer each of them!


VIDEO: LUSH Bath Bomb Recipe HACKED! Free floating bath bomb recipe

Have you been scouring the net for LUSH bath bomb recipes that float?

The LUSH floating bath bomb recipe is tough to figure out.  Why does it float?

I had a bath bomb business for 7 years and I hacked the LUSH formula.

You can make all the floating bath bombs in the following video with my free LUSH bath bomb recipe here.


Even better, you can really get creative with this LUSH bath bomb recipe.

You control the color, shape, essential oils and you can make high impact gifts that don’t break your LUSH budget!

You can use adorable silicone molds and embed color pigment blasts, fizzy frosting, or even a toy!   The embeds and shapes will make them spin and shoot colors.

Take the LUSH bath bomb recipe to the next level

You can also decorate a floating bath bomb with our fizzy frosting and take the cupcake to the next level!  This frosting recipe floats and bubbles on contact with water.  In addition, it can also be shaped into solid hearts like on this cupcake.

Get our Bath Bomb Recipe with Fizzy Frosting

Once you master this recipe, you can even start selling your adorable bath treats.  These are one time use consumables so people come back over and over to buy your amazing bath bakery delights.

Make a Bath Bomb float like LUSH

Floating Bubble Bath bomb

It’s the hardest thing to figure out for a new bath bomb maker…how do you make a bath bomb float like LUSH?  Why don’t any of the online recipes make bath bombs float like LUSH?

Two ingredients Make them Float!

The first one is called SLSA (Sodium Lauryl Sulfoacetate), and you may have it on hand if you are a frequent bath bomb maker.

SLSA Coarse
Buy at Amazon


The other ingredient is Coco Betaine (Cocomidopropyl Betaine).  Both of these ingredients are natural bubbling agents made from coconuts.

Coco Betaine Buy Coco Betaine at Amazon

Coco Betaine is very inexpensive and this bottle from Amazon Prime will last you a long time.  In addition, you can also use it in our bubble bar recipe.


How do I know this will make them float?

Seven years of bath bomb manufacturing & I hacked LUSH’s recipe.

Oh, yes I did.

If you look at LUSH’s large floating bath fizzies, they are using Lauryl Betaine and Sodium Laureth Sulfate together in their formula.

Cocamidopropyl betaine and Sodium Lauryl Sulfoacetate are the perfect ingredient hacks because both are natural,  affordable, widely available and make bath bombs float like LUSH!


Floating Bath Bomb with Fizzy Frosting

Floating Bath Bomb embedded with Fizzy Frosting.

Still don’t believe it?  Watch this video.

The video below shows multiple bath bomb designs using our master recipe.

You can use this recipe to make any shape, size, or color. Then, you can embed smaller fizzies in the fizzy to make it spin and shoot out colors. It’s your playground.

Make a Bath Bomb that Floats like LUSH!

Recipe authorFizzButter

Yield: 15 large Wilton hearts.  Prep time: 15 minutes

NOTE: INGREDIENT NAMES LINKED TO AMAZON FOR EASY PURCHASE.

Buy at Amazon

Dry Ingredients (Plus Fragrance)

Wet Ingredients


  1. STEP 1: Before you Begin!

  • Think of this mixture in two parts: DRY INGREDIENTS and WET INGREDIENTS.
  • DO NOT add any wet ingredients to dry ingredients until you are instructed!
  • It is a good idea to wear gloves and a mask when making any bath treats.

  1. STEP 2: Mix Dry Ingredients Plus Fragrance together

  • Put the dry ingredients in a bowl in this order: citric acid, SLSA, baking soda.
  • Add fragrance.
  • Mix together gently.
  • Set these ingredients aside.

  1. STEP 3: Mix Wet Ingredients Together

  • Next, take your Wilton Color and dissolve it in a very small amount of the water (just enough to make it liquid).
  • Once the color is dissolved, add the rest of the water and the Coco Betaine.
  • Stir gently.
  • Set this aside.

  1. STEP 4: Get Ready to mix wet and dry ingredients together

  • IMPORTANT NOTE: Once you add water to the dry mixture the clock is counting and you need to get it mixed and molded quickly.
  • Get another mixing bowl and put approximately 1/3 of your dry mixture in it.
  • Set aside the rest for your dry mixture until the next round of molding.
  • Now, carefully add 1 TBSP of your color/water mixture and start mixing gently. You will see it foam slightly where the water is added. Get that foam/liquid mixed evenly through your dry mix.
  • Do not overmix. Just mix it to where the water is all through the dry mix.
  • Next, make sure you have added enough water. Take a handful of mixture in your fist and squeeze. When you open your hand does the mix stay together or does it fall apart like dry sand?
  • Test the consistency. Does it hold it’s shape without being sticky to your hand. Yes? You are ready to mold.
  • No? Mix in a LITTLE more water. Do the squeeze test.

  1. STEP 5: Mold your floating Bath Bombs

  • As long as your wet to dry ratio is right, molding should be easy.
  • Quickly mold your bomb by pressing your mixture into your mold. Unmold after a second or two (you shouldn’t have to leave these in for them to stay together.)
  • Place unmolded bath bombs on 18 x 26 sheet pans lined with wax paper.
  • You may get sticking in the corner of your mold after a few uses. This is normal and it doesn’t mean you are doing anything wrong. For example, in a heart shape, the point at the bottom of a heart my try to stick after you have used the mold a few times. For that reason, it is good to have a few more clean, dry molds handy for backup.

  1. STEP 6: Cure your floating bath bombs

  • Bath bombs cure best from 60-80 degrees. In fact, the cooler, the faster and better they cure. Do not put them in a high humidity area as it could cause pimpling on the surface of the fizzy.
  • Never cure your bath bombs in direct sunlight, high temperatures or high humidity.
  • Package your bath bombs after they have cured for 48 hours. Even if they look dry on the outside, there is probably still moisture in the middle, especially on larger fizzies. Ultimately, if you package them too early it may degrade the fragrance or make it smell funky. It can also effect the composition of the fizzy by making it slightly soft. Don’t do it.

Lavender Essential Oil
Get Lavender Essential Oil from Amazon

Buy from Amazon


Troubleshooting your Floating Bath Bomb

Have I added too much water?

You can tell if you added too much water because it will really stick to your hand and you will see your mixture visibly rising out of shape. i.e., you put it in the mold and it sticks so bad, you can’t get it out and it puffs out of shape.

If this has happened, work a little dry mix through it and see if it settles down.

Your target wet to dry ratio is just enough water to make it all stick together and no more.

One final note, if you start to cure your fizzies and they lose their shape and flatten on the bottom, you have added too much water. Large round shapes are the hardest to perfect and any flat design will be easier for a beginner.

Have I used enough water?

If the mix is sandy and doesn’t hold together enough to mold, it is likely you need to add a little bit of water. Be careful to just add a little at a time.

Have I under mixed my wet/dry mix?

You can tell if you under mixed if you get warts on your bath bombs as they sit and cure. It usually shows up very fast. You usually cannot redo them at this point, so just let them cure and use them anyway.

Pro Tip


2 cups of baking soda = 1 pound.
2 cups of citric acid = 1 pound.

Keep this in mind when you need to reorder raw materials.


More information on molds

You can use any kind of metal or milky way plastic mold with this recipe. However, it doesn’t work as well with a silicone mold.

Wilton Heart Cut-out
Get fast at Amazon Prime.

Buy Heart Molds at Amazon We used a Wilton Heart mold on the yellow hearts and a Milky Way Chrysanthemum mold on the aqua colored flowers with gold shimmer below (sold out on Amazon).


TIP:  Mix mica or shimmer with rubbing alcohol and you can paint or stencil your bath bombs!  Or, just dust with shimmer for an adorable touch!

Click for Amazon Prime Link Gold Shimmer Buy from Amazon


Just keep in mind, the less intricate the detail and the fewer sharp corners the better final results.  Also, a flat bottom design like this is easier than a large round one for a beginner.


chrysanthemum mold
Floating Bath Bomb made with Milky Way Chrysanthemum mold and dusted with gold shimmer.

Pro Tip


Because of the bubbles, this bath bomb will not be moisturizing like our Butter Bath Bomb Recipe.  Even if you add oils and butters, they will partially emulsify.

Submit your review
1
2
3
4
5
Submit
     
Cancel

Create your own review

Make a Bath Bomb float like LUSH
Average rating:  
 6 reviews
by Jane on Make a Bath Bomb float like LUSH

Hey, this recipe sounds amazing, but any chance you could tell me the UK equivalent to these measurements?

by Clarice on Make a Bath Bomb float like LUSH

The bubbles are amazing. I had trubble getting them out of tho mould, did I put too much or to little water?

Clarice it sounds like it may have been too much water.

Did the batch expand and expand and rise out of the mold? If yes, it was too much water.

Also, what kind of mold did you use? I would stay away from silicone molds because they really stick with this mixture.

I like the Milky Way and metal molds better. Cut each Milky Way out of the big square piece and use it in your hand one at a time. They work GREAT! And, there are so many styles.

Here's the kind I'm talking about:
https://amzn.to/34ymD5h

by Tisha on Make a Bath Bomb float like LUSH

My daughter and I had the best time making these for her slumber party gift bags! Thank you so much!

by Macy on Make a Bath Bomb float like LUSH

I made these last night with the heart cutout and they turned out great. Please post the frosting recipe soon!

by Shirley on Make a Bath Bomb float like LUSH

Thank you! Thank you! Thank you!  I have tried to figure out this for a long time!

by Nancy on Make a Bath Bomb float like LUSH

Yes! Yes! These were great. The only tricky part is the water. You start to get the feel for the mixture. It's fun to make, too.


Got bath bomb making questions?

Use the comment section below and I will answer all questions.


Butter Bath Bomb Recipe Master

Butter Bath bomb

Our best selling bath bomb 7 years straight!

Free bath bomb recipe for our best selling butter bath bomb. It was our top seller at  FizzButter for 7 years straight.

Butter bomb Butter Bomb embedded with fizzy frosting and dusted with gold shimmer.

Butter Bombs vs. Bubble Bombs

First, bath bombs fall into two broad categories:  moisturizing bath bombs (butter bombs) vs. bath bombs that bubble (floating bath bombs).

So, if you prefer bubbles go to our floating Bubble Bath Bomb Recipe or Bubble Bar Recipe (solid bubble bath recipe).

Who needs a butter bath bomb?

People with dry skin love moisturizing bath bombs.  In fact, during a warm bath your open pores drink in the luscious butters and oils.

I developed this formula because I had cracked, alligator feet.  Not anymore!

Don’t like putting on lotion after a bath? No problem!  Use a moisturizing butter bomb!

Select skin nourishing butters in their purest form without preservatives or chemicals.  You won’t have to read the label because you know what is in it!

Mango Butter
Use skin nourishing butters in their purest form without preservatives or chemicals.

Buy at Amazon

Use your favorite Butter combo

From the beginning, our master formula included shea butter.  If I was still manufacturing today, I would use shea.  In my opinion, shea is the king of butters and the cornerstone of any butter combination.

It’s so easy to customize this master recipe with your favorite choice of luscious butters and oils.

Shea Butter
Get Raw Shea Butter fast from Amazon.

Buy at Amazon


Citric Acid – Ingredient Spotlight


Citric acid can be coarse or fine grain. In addition, grain size DOES make a difference in the finished product.

If you use a small grain citric acid, like Milliard you will get a harder bath bomb with a smoother surface. Fine grain will clump if exposed to humidity so be sure to store it in a tightly closed bag.

Citric acid can irritate the skin (MSDS sheet) so it is a good idea to wear gloves when you are making bath bombs.

Citric Acid
Fine grain citric acid works best.  Get Milliard at Amazon.

Buy at Amazon


Butter Bath Bomb Recipe Master

Recipe authorFizzButter Yield: 7 Jumbo or 14 small bath bombs. Prep time: 15 minutes

NOTE: INGREDIENT NAMES LINKED TO AMAZON FOR EASY PURCHASE.

T = TABLESPOON = TBSP = 15ML
t = teaspoon = tsp = 5ML

Buy at Amazon

Ingredients


  1. STEP 1: Mix your Dry Ingredients plus Oils

  • Get a medium mixing bowl.
  • Mix together: Baking soda, citric acid, epsom salt, melted shea butter, grapeseed oil, color, and fragrance.

  1. STEP 2: Mix cold water into your dry mixture

  • Put half your dry mixture into a small bowl and add 1/2 T cold water on top.
  • Mix just enough to get all the water dispersed and no more. You will notice the color has darkened and distributed more evenly.
  • Test your wet/dry ratio: take a handful of mix and squeeze it in your fist. When you open your hand does it hold its shape or does it fall apart like dry sand? If it holds it shape, go ahead to the next step. If it crumbles like dry sand, add a little more water and mix.

  1. STEP 3: Mold your Bath Bombs

  • Get your Round stainless steel molds lined up. Make sure they are cool and dry. Warm molds can sometimes stick.
  • Pack and unmold one before you do them all so you can verify your wet/dry ratio. Once you have mastered the feel for how much water it takes, you have mastered this recipe.
  • Place unmolded bath bombs on a waxed paper. These 18 x 26 sheet pans lined with wax paper work great.

Always Use Stainless Steel or Plastic Molds

Never use aluminum when making bath bombs because it can discolor your mixture and turn it grey.

Stainless Steel Mold
Always use stainless steel molds. Aluminum reacts to citric acid and should never be used.

Buy at Amazon


Cure your Bath Bombs like a Pro

    • Bath bombs cure best from 60-80 degrees. In fact, the cooler, the faster and better they cure.
    • Do not put them in a high humidity area as it could cause pimpling on the surface of the fizzy.
    • They really should not be packaged for 48 hours. Even if they look dry on the outside, there is usually still moisture in the middle.
    • Never cure them or store them in direct sunlight.

    Troubleshooting

    Have I added too much water? If you added too much water the bomb may stick to the mold so bad that it won’t come out. You want the mix to be slightly damp, not wet. After you unmold, it should hold it’s shape and not flatten out on the bottom after a few minutes.

  • Have I used enough water? If the mix is sandy and doesn’t hold together enough to mold, it is likely you need to add a little bit of water. Be careful to just add a little at a time.
  • Have I undermixed my wet/dry mix? You can tell if you undermixed if you get warts on your bath bombs as they sit and cure. It usually shows up very fast. You usually cannot redo them at this point, so just let them cure and use them anyway.


    Pro Tip


    If you add SLSA to this master recipe, it will emulsify the butters which does two things:

    1. Suspends the butter so it won’t stick to the side of the tub.
    2. Makes the bath bomb less moisturizing.
    Note: In our best selling butter bath bomb, we wanted full-on, messy butter because there is nothing like it for dry skin. If you don’t want that, simply add 1TB SLSA COARSE to this master recipe.

    Free Butter Bath Bomb Recipe
    Butter Bath Bomb with pink epsom salt on the white area. Use your imagination

    Submit your review
    1
    2
    3
    4
    5
    Submit
         
    Cancel

    Create your own review

    Butter Bath Bomb
    Average rating:  
     3 reviews
    by Casy on Butter Bath Bomb

    I love this bath bomb!!! I have very dry skin and this makes me so soft.

    by Marla on Butter Bath Bomb

    This has been my favorite bath bomb for years when it was sold at fizzbutter.

    by Xi on Butter Bath Bomb

    Best bath bomb i ever used.

Have any bath bomb making questions?

Use the comment button below and I will answer all questions.